The reputation of mechanical keyboards for their durability and long-lasting nature isn’t all hearsay – they often outshine their counterparts by more than a decade. However, to relish this silky smooth typing experience for such an extended period, keyboard care is crucial. This includes cleaning keycaps, taking care of the USB cable, and yes, even switching out those switches as needed. So if you’re grappling with worn-out keycaps, unruly switches, fading key signs or just fancy a change in your typing sound or feel, learning how to remove keyboard switches without tools could be your easy and budget-friendly answer.
Prepping Your Keyboard
Ready to venture into the realm of switch swapping? First things first, power down and disconnect your mechanical keyboard. This effortless yet vital step safeguards against any inadvertent mishaps during the operation.
Keep in mind, there are two categories of keyboards in the realm of switch replacement: hot-swappable and non-hot-swappable. The former is a breeze, letting you yank out old switches and pop in new ones straight away. The latter, though, demands a tad more elbow grease – you’ll need to dismantle the keyboard case to reach the PCB (Printed Circuit Board) and wield a soldering iron plus a solder pump to switch things up. But don’t fret! With a dash of ingenuity and a pinch of patience, both types can be handled sans tools.
Choosing Your Switches
Switches are what make each keystroke on a mechanical keyboard unique. They come in various types—commonly identifiable by color—and each offers a distinctive sound and feel. For instance, blue switches are famous for their tactile feedback and audible clicky sound. On the other hand, red switches offer smooth keystrokes with little noise—a favorite among gamers.
When choosing new switches for your keyboard, consider what you want from your typing experience. Are you after that satisfying clicky sound? Or do you prefer a silent but tactile response? Whatever your preference might be, there’s a switch out there waiting for you. Check out this comprehensive guide on best keyboard switches to explore more options.
Removing Keys Without Tools
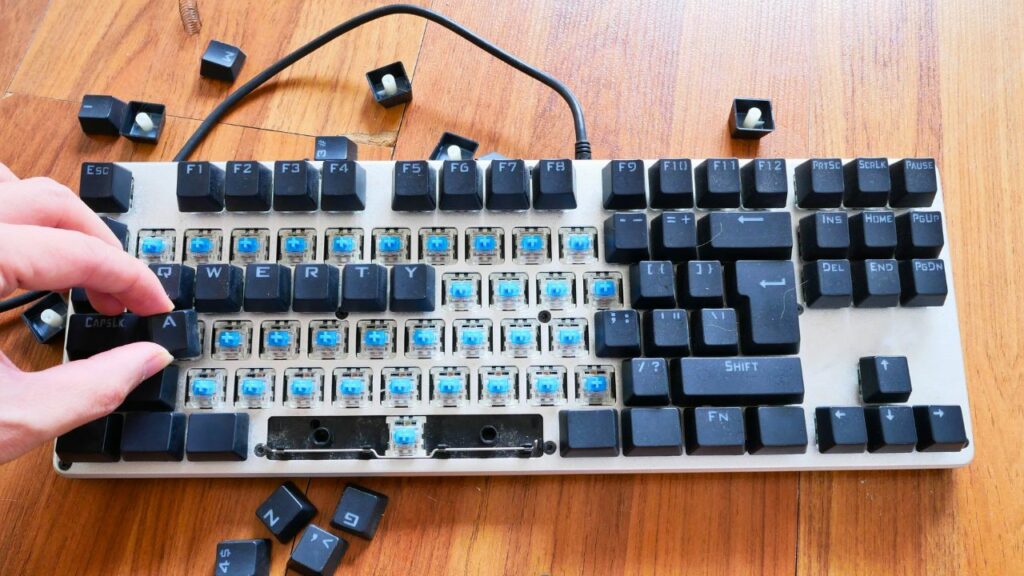
Now comes the interesting part—removing keys without tools! All you need is an everyday object such as a house key or credit card to gently pry up the keycap. It’s all about applying gentle but firm pressure under the cap until it pops off. You could also create DIY tools at home using common items like paperclips or screwdrivers.
Swapping Out Hot-Swappable Switches
If your keyboard is hot-swappable, then replacing its switches will be relatively straightforward once all keycaps are removed.

Gently pull up each switch using thin objects like tweezers or even sturdy fingernails if necessary! Make sure not to force anything; if it feels too tight or doesn’t budge easily, try another angle before applying more pressure.
Once removed, simply align your new switch correctly with its slot on the PCB (the pins should face towards keys “Q” & “E”) then push it down firmly until secure.
After replacing all desired switches make sure each one works properly by testing them with key tester software.Here’s an in-depth comparison between Glorious Panda vs Holy Panda, two popular switch choices among enthusiasts.
Handling Non-Hot-Swappable Keyboards
If you own a non-hot-swappable keyboard things get slightly trickier—but don’t worry! It’s still manageable with some patience and care.
Firstly remove all keycaps as mentioned above then disassemble your keyboard case carefully—the screws usually hidden under rubber pads or stickers—to expose its PCB.
You’ll notice small solder joints securing each switch onto PCB which need heating up using something like a lighter or hot needle before being sucked away with homemade suction tool (an empty ink pen works well).
Insert your new switch ensuring correct alignment as described earlier then test them thoroughly before reassembling everything back together.Here’s an insightful discussion about Outemu vs Gateron, two highly competitive brands in this field.
Understanding the Mechanism of a Keyboard Switch
Before you roll up your sleeves to swap out switches, let’s get acquainted with the nuts and bolts of what you’re dealing with. Picture a keyboard switch as a mini device featuring a housing, a spring, and a stem. With every key press, the stem nudges the spring down, sparking off an electrical circuit that signals your computer. This insight into how it all works will empower you to handle the switches more effectively and confidently during your replacement mission.
The Anatomy of Popular Switches
While all switches operate on the same basic principle, they can vary significantly in their construction and feel. For example, linear switches like Cherry MX Reds offer smooth keystrokes without any tactile bump or audible click—making them ideal for fast-paced gaming. In contrast, tactile switches like Cherry MX Browns provide noticeable feedback halfway through each keystroke—a favorite among typists and programmers. Learn more about the anatomy of these popular switches here to make an informed decision when choosing replacements.
Creating DIY Tools at Home
Removing keys and replacing switches without specialized tools might seem challenging, but with some creativity and common household items, you can create your own set of DIY tools. For instance, a bent paperclip or tweezers can work as a makeshift keycap puller or switch puller for hot-swappable keyboards. For non-hot-swappable keyboards requiring soldering work, you might find an empty pen useful as a solder sucker.
Caring for Your Mechanical Keyboard Post-Switch Replacement
Replacing switches is just one facet of mechanical keyboard maintenance. Post-switch replacement care is equally critical to ensure the longevity of your device. Regularly cleaning your keyboard with compressed air or a soft brush can prevent dust and crumbs from interfering with switch operation. Avoiding liquids near your keyboard can prevent accidental spills that could damage its electronic components.
FAQs
Q: Is it possible to swap out switches on just about any mechanical keyboard?
A: Switch replacement on mechanical keyboards, both hot-swappable and non-hot-swappable, is absolutely possible. However, tread with caution if you’re dealing with a non-hot-swappable keyboard as it will require some soldering work that calls for extra steps and care.
Q: Could you share some widely favored keyboard switch types?
A: Typical types of mechanical keyboard switches you’ll come across include the linear ones, like Red, tactile varieties such as Brown, and the clicky kind exemplified by Blue.
Q: How often should I change my keyboard switches?
A: The frequency depends on usage patterns and personal preferences—like wanting different sound or feel—but generally speaking, good quality switches last for millions of keystrokes.
Q: Can I mix different types of switches on my keyboard?
A: Absolutely! Some users prefer certain switch types for specific keys based on their typing habits or gaming needs.
Tailoring Your Experience With Kailh & Outemu Switches
For those of you interested in customizing further by using Kailh & Outemu switches in particular—you’re in luck! These require special Kailh style openers which can also be made at home using readily available materials like plastic cards.Here’s another comparison between Outemu vs Cherry MX , which might assist in making an informed decision about which one suits your needs better.
To wrap up remember that taking care of your mechanical keyboard goes beyond cleaning—it involves understanding how each component works together creating that perfect typing experience tailored just for YOU!